Sunday, July 14, 2013

Summer Side Dish - Broccoli Salad - great to take to a party

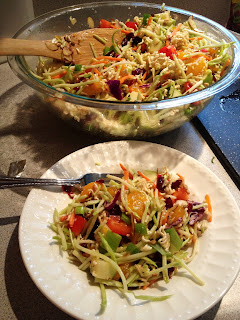
Broccoli Slaw Salad (Olympic Salad)
From: Amy Hoffman


Amy made this salad a few weeks ago and brought it to a get together. It is loaded with flavor and goodness.  Despite the sugar in the dressing part, it is mostly healthy ;0) It is so simple to make that it is a great dish for a last minute get together. It makes a ton so be ready to feed an army with the side dish!


Ingredients:
1 pkg broccoli slaw
1 bunch chopped green onion
1 cup slivered almonds
1 chopped granny smith apple
1/2 c. (or I used one whole) chopped red bell pepper
1 cup sunflower seeds
1 pkg craisins (about 1 - 2 cups)
1 (I used 2) cans mandarin oranges
2 pkgs chicken flavored raman noodles, finely crushed (save packets for dressing)

Dressing:
1/2 cup sugar
3/4 cup canola oil (I used the olive oil I already had)
1/3 white or raspberry wine vinegar (I used red wine) 
2 Tbsp. powdered chicken broth (I used the 2 packets from the Raman noodles even though the original recipe said to throw them out and use powdered chicken broth instead. I didn't really find it necessary to throw out a perfectly comparable ingredient)!

Directions: (Ready? You'll blink and miss them!)
Mix all ingredients. Mix dressing and toss with salad. Refrigerate until ready to eat. 


Tuesday, July 9, 2013

Scallops are better when you pick them yourself :0)


Reece and I started a new tradition a few years ago that I hope we continue for a long, long time. We discovered 'scalloping' in St. Joseph's Bay, Florida. Both of us love seafood, but have a special spot for those tiny little morsels of yumminess. You might not know it, but scallops live just a few feet below the surface of the water, usually making their home at the edge of sea grass beds. What we consider a scallop is actually the muscle of the organism. It lies within a pretty shell and beneath an ugly mess of gook! To go 'scalloping', you can either park your car on the side of the bay and wade out in the water looking for them, or you can take your boat out on the water and go snorkeling which is what we prefer! During a good season, you can max out your limit of 2 gallons (in the shell) per person per day, in no time. We just returned from a vacation down to the coast, staying on Cape San Blas. While Mother Nature was not exactly on our side this time, we did defy her and spent a few hours on the water collecting our bunch.  The first night we cooked the batch for the beach crew and the second bunch we saved for my family back at home. 

While shucking scallops is not the most pleasant experience, it is most definitely worth it in the end. First you have to pry open the closed shell with a shucking knife (those little suckers are strong too!), then you peel back the layer of gook, being careful not to tear the delicate muscle. The final step to shucking is scraping the   scallop meat loose from it's shell.  (RECIPE for cooking scallops below)


RECIPES for quick scallops:
Ingredients
Of course you want the freshest scallops you can find (these are bay scallops, smaller than sea scallops)
Fish Fry
Buttermilk
Old Bay Seasoning
salt 
pepper
oil for frying
butter for sauteing

FRYING
Heat vegetable or peanut oil in large cast iron skillet. Soak scallops in buttermilk bath for a few minutes then roll in mixture of fish fry,Old Bay seasoning, salt, and pepper. Fry a few scallops at a time and drain on paper towel. 

SAUTEE
Melt butter in cast iron skillet. Add scallops, Old Bay, salt and pepper to flavor. Cook for a few minutes then serve hot. 

Tuesday, June 25, 2013

Fruit Popsicles

Fruit Pops

I love having a summer birthday. You always get fun, summery gifts that just make you happy (and I am not just talking about the money!). This year, my brother and sister-in-law gave me a set of Popsicle molds. I tested them out last weekend with a few peaches I had lying around and Reece gave me 2 thumbs up. I bought a ton of fruit this week with the intention of making even more sweet (almost healthy) treats. The recipe is simple, which I obviously like. More than 5 or so ingredients, and you loose my interest. Have fun experimenting with different fruit combinations. 

(Photos below)


Peach Pops
4 ripe peaches
5 Tbsp sugar
several squeezes of lime juice (fresh is always best, but who always has limes lying around?! you can also use the stuff in the bottle)

Quick Tip for peeling peaches: boil a small pot of water on stove; cut 'x' through skin of peach on the bottom side; put peach in boiling water, 'x' side down for a minute or so; remove from boiling water and let cool until you can handle. Now you can easily peel the skin away from the peach :-)

In a blender, mix fruit, sugar, and lime juice. Do a taste test and add more sugar if necessary. 
Pour in to Popsicle molds and freeze for at least 6 hours. The pops should be good for about a week. 

Triple Berry Threat Pops
Raspberries
Blueberries
Strawberries
sugar
lime juice

Mix all ingredients in blender and pour in to molds. Freeze 6 hours. 

Fruit ready to cut up
pretty fruit

Add sugar and lime juice
pour in to molds

put the cap on and let the freezing begin!


Monday, June 24, 2013

Biscuit Queen

Biscuit Queen 

This month, I was featured in Cobb Life Magazine for my biscuits! I contacted them a few months ago after reading a blurb in the magazine that they were looking for unique stories about biscuits. I couldn't help but share my story. My Jo was the best Southern cook of all things, but her biscuits were out of this world. I learned how to make them just before she passed away last year. I know she would be proud of biscuit skills, so this article is a tribute to her. 

To find the recipe within this blog:
- Select 'January' from the pull-down menu on the right
- Choose the blog titled "Biscuit Heaven"

Links to the article online:
- Cobb Life Magazine - Biscuit issue

I am beyond thrilled to be sharing 'Jo's Biscuits' with the world (okay...maybe just Cobb County...and friends and family)! 

Enjoy :0)

~Katie

Summer Salmon Sensation

Summer Salmon Sensation 

Last week I was searching for a light, summery dish when salmon popped in to my brain. I decided to stop by Harry's Farmers Market on my way home from work and I hit the jackpot! They were having a one-day sale on wild-caught Alaskan salmon (only the best) so I knew it was a must! I found a very simple recipe online and paired it with simple veggies. While it was a very healthy and light meal, it was also very hearty. 

Ingredients:
Best salmon fillets you can find (they will likely have pin bones in them, so be careful)
2 Tbsp. butter
2 Tbsp. olive oil 
salt 
pepper
dill

Directions:
Preheat oven to 450 degrees. 
Place salmon fillets skin-side down on baking sheet lined with aluminum foil and coated with baking spray (Pam). 
If butter is not soften, stick it in the microwave for a few seconds. Combine butter and olive oil. Stir in salt and pepper. 
Using pastry brush, smear butter mixture all over fish. 
Sprinkle dill all over salmon fillets. 
Bake salmon for about 15 minutes.

Pair with:
- Roasted (or grilled) asparagus   
(I coat my asparagus with a small amount of olive oil, salt and pepper. Bake in oven for about 10 minutes alongside salmon. Lightly drizzle balsamic vinegar over asparagus immediately after you remove from oven.)
- And/or roasted potatoes


Yum - wish I had remembered to take a picture! Next time...

Thursday, February 21, 2013

Famous Buckeyes (Peanut Butter Balls)

If there is one sweet treat I am famous for, it is my buckeyes. I learned to make them years ago from a long-time friend, Katie. She had them at a Christmas party and shared the recipe with me. Over the years, they have become my signature holiday treat. Creamy peanut butter wrapped in a blanket of milk chocolate. Sounds simple, but they are truly a labor of love.

Ingredients:
Creamy Peanut Butter (disregard the cookie butter pictured below!)
melted butter
confectioner's sugar
Candiquik chocolate (secret weapon to not having the chocolate melt so quickly)


Step 1: Mix peanut butter, confectioner's sugar, and melted butter until you reach a non-sticky, but non-crumbly mixture (Notice I do not put measurement amounts, because I never measure!! For me, this is an 'eyeball it' kind of recipe - you may have to add a little conf. sugar if its too sticky or add a little butter if its too thick and crumbly)


Step 2: Pinch small amounts of peanut butter off the dough ball and make rounds by rolling between the palms of your hands. Place peanut butter balls on cookie sheet lined with wax paper.


Step 3: Coat balls with melted chocolate. I use a product called Candiquik...I came across it years ago and it has changed my baking life! I first used chocolate morsels, but would run in to the chocolate melting too quickly. That's when I did my research and found this product. You can find it in most grocery stores on the baking aisle or around the holidays, in the holiday display. I will admit it can be tricky to find. 
To coat the balls, I use two spoons...this is what I have found the easiest for me. You may think of another way. When I was given the recipe, Katie said she would put the peanut ball on a toothpick and dip in the chocolate...didn't work so well for me. 


Step 4: Using the spoon on the left (I am left-handed...might be opposite for you), transfer the chocolate covered ball to the cookie sheet. Let them harden at ROOM TEMPERATURE. No need to stick them in the freezer or fridge to harden. I usually do store then in the fridge, but after they have sat out for a while. 


Edamame Yummy!


Surprisingly, edamame has become one of my husband's favorite foods! I say this because if you know Reece, he is actually picky - he will eat any type of meat - A-N-Y....this includes squirrel - but will turn his nose up at something healthy for him. 

We got hooked on Taquiera Tsunami's edamame and have tried to re-create it here. 

Ingredients:
Frozen Edamame (any grocery store should have it)
Soy sauce
Seasoning (Chili powder or I used my Chili 9000 which has several different spices in one)

Cook edamame per package directions. Once you remove from heat, immediately dash soy sauce over the beans (but don't saturate them too much); sprinkle your spices over, and toss. 

Simple, easy, healthy snack or appetizer.